Tag: Recipes

  • Chicken Pot Pie

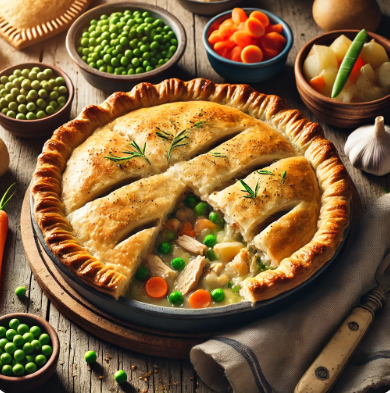
    “Cozy up with this easy chicken pot pie recipe! Made with precooked chicken, frozen veggies, and a creamy homemade sauce, this golden, flaky-crusted comfort food is perfect for family dinners or a hearty meal any night. Quick, delicious, and satisfying!”

    Ingredients:

    • Filling:
      • 2 cups precooked chicken, shredded or diced
      • 1 cup frozen peas
      • 1 cup frozen carrots
      • 1 cup frozen green beans
      • 1 cup cubed potatoes (precooked or canned)
      • 1/4 cup butter
      • 1/4 cup all-purpose flour
      • 2 cups chicken broth
      • 1/2 cup milk (whole or 2%)
      • 1/2 tsp salt
      • 1/4 tsp black pepper
      • 1/2 tsp dried thyme
      • 1/2 tsp garlic powder
    • Crust:
      • 1 package of store-bought pie crusts (or use puff pastry)

    Instructions:

    1. Preheat oven: Set to 400°F (200°C).
    2. Make the filling:
      • In a medium saucepan, melt butter over medium heat.
      • Whisk in flour, cooking for 1 minute to create a roux.
      • Gradually add chicken broth and milk, whisking continuously until smooth and thickened.
      • Stir in salt, pepper, thyme, and garlic powder.
      • Add chicken, peas, carrots, green beans, and potatoes to the sauce. Mix until combined and warmed through. Remove from heat.
    3. Assemble the pie:
      • Roll out one crust and place it in a 9-inch pie dish, trimming excess.
      • Pour the filling into the crust.
      • Cover with the second crust. Pinch edges together to seal and cut small slits in the top for ventilation.
    4. Bake:
      • Place pie on a baking sheet to catch drips. Bake for 30-35 minutes or until the crust is golden brown.
    5. Cool:
      • Allow the pie to cool for 10 minutes before serving.

    Tips:

    • Use rotisserie chicken for added flavor and convenience.
    • Pre-cook diced potatoes in salted water until tender but firm.
    • For a glossy crust, brush the top with beaten egg before baking.
    • To save time, substitute frozen mixed vegetables for individual ones.
    • Avoid overfilling to prevent bubbling over.
    • Cover edges of the crust with foil if they brown too quickly.

    Enjoy your homemade chicken pot pie!

  • Shredded Chicken Quesadilla


    “Whip up this irresistible shredded chicken quesadilla recipe! Packed with Colby Jack, Monterey Jack, black beans, and fresh veggies, this golden, cheesy delight is perfect for quick lunches or family dinners. Pair with salsa or sour cream for a crowd-pleasing, flavor-packed meal. Simple ingredients, bold taste!”

    Ingredients

    • 2 cups shredded chicken (pre-cooked)
    • 1 cup Colby Jack cheese, shredded
    • 1 cup Monterey Jack cheese, shredded
    • 4 large flour tortillas
    • 1/2 cup black beans (drained and rinsed)
    • 1/4 cup red onion, finely diced
    • 1/2 orange bell pepper, finely diced
    • 1/2 tsp ground black pepper
    • 1/2 tsp garlic powder
    • 1/4 tsp red cayenne powder (adjust for spice level)
    • 1 tbsp olive oil

    Instructions

    1. Prepare the Chicken Filling
      • Heat a skillet over medium heat and add olive oil.
      • Sauté red onion and orange bell pepper until softened (about 3-4 minutes).
      • Add the shredded chicken, black beans, ground pepper, garlic powder, and cayenne powder. Stir and cook for 2-3 minutes to combine flavors. Remove from heat.
    2. Assemble the Quesadilla
      • Lay a tortilla flat on a clean surface. Sprinkle a layer of Colby Jack and Monterey Jack cheese on one half of the tortilla.
      • Spoon the chicken mixture evenly over the cheese layer. Add a second light sprinkle of cheese on top to help it stick.
    3. Cook the Quesadilla
      • Heat a clean skillet or griddle over medium heat. Place the assembled tortilla in the skillet, fold it in half, and gently press down.
      • Cook for 2-3 minutes on each side, or until the tortilla is golden brown and the cheese has melted.
    4. Serve
      • Remove from the skillet, slice into wedges, and serve immediately. Pair with salsa, sour cream, or guacamole for dipping.

    Tips for the Perfect Quesadilla

    • Use a Non-Stick Skillet: Prevent sticking and ensure even browning by using a non-stick pan or lightly greasing the skillet.
    • Even Filling: Avoid overfilling the quesadilla to prevent spilling when flipping.
    • Customize the Spice: Adjust cayenne powder to your preferred heat level, or omit it for a milder flavor.
    • Crispier Texture: Brush the tortilla with a thin layer of butter or oil before cooking for an extra crispy finish.
    • Melting the Cheese: To ensure gooey cheese, cook on medium heat. Too high heat might burn the tortilla before the cheese melts.
    • Meal Prep Friendly: Cook the chicken mixture in advance and store it in the fridge for quick assembly.

    Enjoy making this easy and delicious dish with your personal twist!

  • BBQ Chuck Roast Sandwich

    Savor the ultimate comfort food with this BBQ Chuck Roast Grilled Cheese! Tender, slow-cooked chuck roast, gooey Colby Jack cheese, and crispy sourdough come together for a sandwich that’s smoky, cheesy, and utterly satisfying. Perfect for family dinners or hearty lunches, this recipe is packed with flavor and easy to customize. Try it today and elevate your grilled cheese game to gourmet levels!

    Ingredients

    For the Chuck Roast:

    • 1 lb chuck roast
    • 2 tsp kosher salt
    • 1 tsp ground pepper

    For the Sandwich:

    • 4 slices sourdough bread
    • 1 cup shredded Colby Jack cheese
    • 2 tbsp herb butter (softened)
    • BBQ sauce (add to taste after cooking)

    Instructions

    1. Prepare the Chuck Roast:
      • Season the chuck roast with kosher salt and ground pepper on all sides.
      • In a slow cooker or oven, cook the chuck roast until tender (approx. 4-6 hours on low in a slow cooker).
      • Shred the cooked chuck roast with two forks and set aside.
    2. Assemble the Sandwich:
      • Butter one side of each slice of sourdough bread with herb butter.
      • On the unbuttered side of two slices, layer shredded Colby Jack cheese and a generous portion of shredded chuck roast.
      • Sprinkle a touch of ground pepper on top, then add another layer of shredded cheese.
    3. Cook the Sandwich:
      • Heat a skillet or griddle over medium heat.
      • Place the sandwiches buttered side down in the skillet. Press lightly with a spatula and cook until the bread is golden and crispy, and the cheese is melted (about 3-4 minutes per side).
    4. Add the BBQ Sauce:
      • Carefully split open the cooked sandwich and drizzle or spread your desired amount of BBQ sauce directly onto the chuck roast. Close the sandwich and allow it to warm for a minute on the skillet to meld the flavors.
    5. Serve:
      • Slice the grilled cheese in half and serve hot, garnished with a sprinkle of fresh parsley or alongside crispy potato wedges for a complete meal.

    Enjoy the balance of smoky BBQ flavors, melty cheese, and buttery sourdough with every bite!

    Cooking Tips for the Perfect BBQ Chuck Roast Grilled Cheese

    1. Choose Quality Bread: Sourdough adds a tangy flavor and holds up well to the hearty chuck roast and melted cheese. Opt for thick, evenly sliced pieces.
    2. Cook Low and Slow: For the chuck roast, low heat over a longer period ensures tender, juicy meat that’s easy to shred.
    3. Butter Evenly: Spread the herb butter evenly on the bread for a golden, crispy crust. Room-temperature butter makes this easier.
    4. Control the Heat: Cook the sandwich on medium heat. Too high, and the bread will burn before the cheese fully melts.
    5. Customize the Sauce: Adding BBQ sauce after cooking allows you to control the amount and keeps the bread from getting soggy. Use your favorite sauce for personalized flavor!