Tag: Recipes

  • Ultimate Crispy Butter-Battered Poutine

    Description

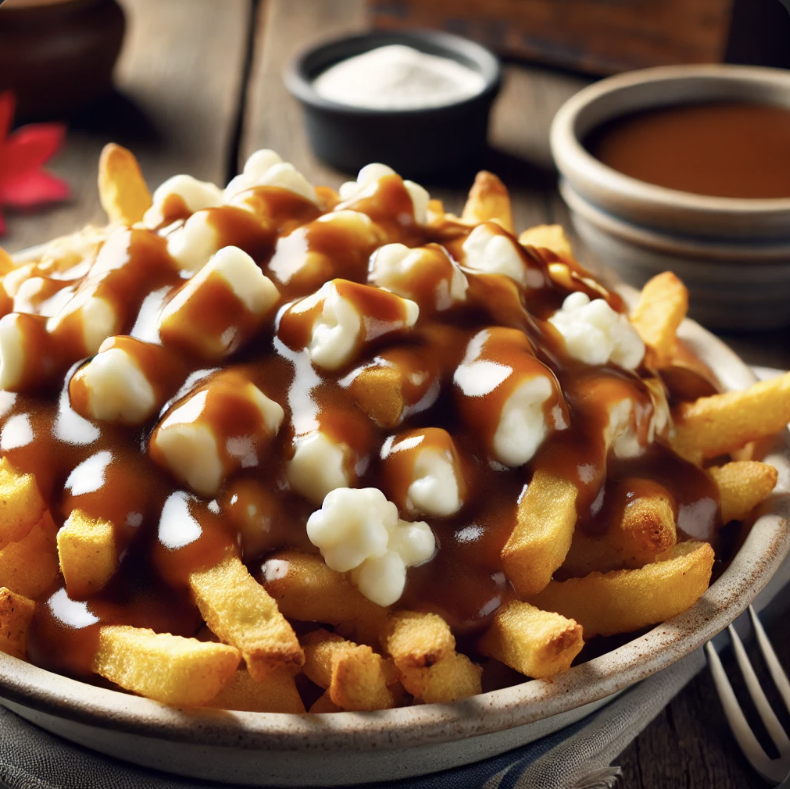
    This indulgent twist on classic poutine features double-coated, butter-battered fries fried to crispy perfection. Smothered in a rich homemade beef gravy and topped with squeaky white cheese curds, this dish is the ultimate comfort food. Every bite delivers a satisfying crunch followed by a velvety, savory finish—perfect for game nights, gatherings, or whenever you crave something truly decadent.

    Ingredients

    For the Gravy:

    • 2 tablespoons cornstarch
    • 3 tablespoons water
    • 1 stick unsalted butter
    • ¼ cup all-purpose flour
    • 32 ounces beef broth
    • Pepper to taste

    For the Fries:

    • 1 ½ to 2 pounds frozen french fries
    • 1 cup corn masa
    • 1 tablespoon Lawry’s Seasoned Salt
    • 2 sticks unsalted butter, melted
    • Fry oil (for deep frying)

    For Assembly:

    • 20 ounces white cheese curds
    • Salt and pepper to taste

    How to Make It

    1. Prepare the Gravy:
      • In a small bowl, whisk together cornstarch and water until smooth. Set aside.
      • In a medium saucepan over medium-low heat, melt 1 stick of butter.
      • Sift in the flour and stir continuously with a flat spatula for 2-3 minutes until golden and smooth.
      • Whisk in the beef broth and bring to a simmer. Slowly add the cornstarch mixture while whisking.
      • Simmer for 1-2 minutes until thickened. Season with pepper and keep warm.
    2. Make the Butter-Battered Fries:
      • In a shallow pan, pour the melted butter.
      • In a medium bowl, mix the corn masa and Lawry’s Seasoned Salt.
      • Working in batches, dip each fry into the butter, then coat with the masa mixture. Shake off excess, then repeat the butter and masa coating for a double layer. Place coated fries on a baking sheet.
    3. Fry the Fries:
      • Heat 3 inches of oil in a deep fryer or Dutch oven to 350°F.
      • Fry the coated fries in batches until golden brown and crispy. Remove and drain on a wire rack.
    4. Assemble the Poutine:
      • Place the hot fries in a large bowl.
      • Top with cheese curds and pour warm gravy over them.
      • Toss gently to coat, then serve immediately.

    Tips for Perfect Poutine

    • If the gravy thickens too much before serving, whisk in a bit of extra broth to loosen it.
    • Use high-quality cheese curds for the best texture and authentic squeaky bite.
    • For extra crispiness, fry the coated fries twice—once at 325°F until lightly golden, then again at 375°F for a crispy exterior.
    • Serve immediately to enjoy the perfect balance of crispy fries, melty cheese, and rich gravy.
  • How to Properly Season a Cast-Iron Pan

    How to Properly Season a Cast-Iron Pan

    The Forested Fork – Bringing Homecooked Tradition to Your Kitchen

    There’s nothing quite like cooking on a well-seasoned cast-iron pan. Whether you’re frying up fresh trout by the river or searing a thick-cut steak in your kitchen, cast iron delivers unbeatable flavor and durability. But to keep your pan in top shape, seasoning is key. If you’re new to cast iron or just need a refresher, here’s how to properly season your skillet for a lifetime of cooking.

    What is Seasoning?

    Seasoning is the process of baking oil into the surface of your cast-iron pan, creating a natural, non-stick coating. This protective layer prevents rust, improves cooking performance, and enhances the flavor of your food over time.

    Step-by-Step Guide to Seasoning Your Cast Iron

    1. Wash and Dry Thoroughly

    Start by scrubbing your pan with warm water and a small amount of mild soap (yes, it’s okay to use soap this one time). Use a stiff brush or scrubber to remove any residue. Rinse well and dry completely—moisture is the enemy of cast iron! To ensure it’s fully dry, place it over low heat for a few minutes.

    2. Apply a Thin Coat of Oil

    Once dry, apply a very thin layer of oil to the entire pan—inside, outside, and even the handle. Use a high-smoke-point oil like flaxseed, canola, vegetable, or grapeseed oil. The key is thin—too much oil will leave your pan sticky. Use a paper towel to spread the oil evenly and wipe off any excess.

    3. Bake It at High Heat

    Preheat your oven to 450-500°F. Place the pan upside down on the middle rack to prevent pooling oil, and put a baking sheet or foil on the lower rack to catch drips. Bake for one hour, then turn off the oven and let the pan cool inside.

    4. Repeat for Best Results

    One seasoning cycle is a good start, but for the best non-stick surface, repeat the process 2-3 times. Over time, regular cooking (especially with fatty foods like bacon) will continue to build up the seasoning.

    How to Maintain Your Seasoning

    • Clean gently: After each use, wipe out your pan or rinse with warm water. Avoid harsh soaps and never soak it.
    • Dry immediately: Always dry your pan right away and heat it briefly on the stove to remove moisture.
    • Reapply oil: Rub a light coat of oil after each cleaning to maintain the seasoning.
    • Avoid acidic foods: Cooking tomatoes or vinegar-based dishes too often can strip seasoning, so be mindful.

    A Well-Seasoned Legacy

    A properly seasoned cast-iron pan isn’t just a cooking tool—it’s a piece of history. With a little care, your pan can last for generations, improving with every meal. So, fire up the skillet, cook with confidence, and keep the tradition alive!

    Have a favorite cast-iron recipe? Share it with us in the comments!

  • Campfire Cowboy Hash

    Description:
    This hearty one-pan meal is perfect for a rustic camping trip. Packed with smoky sausage, crispy potatoes, and gooey cheese, it’s a filling dish that will keep you energized for a day of outdoor adventure. Cooked over the fire in a cast-iron skillet, this cowboy hash is easy to make and bursting with flavor.


    Ingredients:

    • 1 lb smoked sausage (or kielbasa), sliced
    • 3 large russet potatoes, diced
    • 1 small onion, chopped
    • 1 red bell pepper, chopped
    • 1 green bell pepper, chopped
    • 3 cloves garlic, minced
    • 2 tbsp olive oil (or bacon grease for extra flavor)
    • 1 tsp smoked paprika
    • ½ tsp black pepper
    • ½ tsp salt
    • 1 cup shredded cheddar cheese
    • 4 eggs (optional)
    • Chopped green onions or parsley for garnish

    How to Make It:

    1. Prep the Fire: Build a strong campfire and let it burn down to hot coals. Place a cast-iron skillet over the fire or on a camp stove.
    2. Cook the Sausage: Heat oil in the skillet and add sliced sausage. Cook until browned, about 5 minutes. Remove and set aside.
    3. Sauté the Veggies: In the same pan, add onions, bell peppers, and garlic. Sauté until softened.
    4. Crisp the Potatoes: Add the diced potatoes, seasoning with paprika, salt, and black pepper. Cook, stirring occasionally, until golden brown and crispy, about 10-15 minutes.
    5. Combine & Melt Cheese: Stir the cooked sausage back into the pan. Sprinkle cheese over the top and let it melt.
    6. Add Eggs (Optional): Make small wells in the hash and crack eggs into them. Cover the skillet with foil or a lid and cook until eggs are set, about 5 minutes.
    7. Garnish & Serve: Sprinkle with green onions or parsley, then serve hot!

    Camping Tips:

    🔥 Use pre-cooked potatoes – Boil them at home before your trip for a quicker cook time.
    🔥 Wrap in foil for easy reheating – If you have leftovers, wrap portions in foil and place them over the coals to warm up later.
    🔥 Spice it up – Add jalapeños or hot sauce for a kick.
    🔥 Make it your own – Swap out sausage for bacon or ground beef, or add mushrooms for extra earthiness.

    This cowboy hash is an easy and satisfying meal that brings comfort food to the great outdoors! 🏕️🔥

  • Homemade Chipotle Sauce

    Ingredients for Chipotle Sauce

    • 1 cup sour cream
    • 1/2 cup mayonnaise
    • 4-6 chipotle peppers in adobo sauce (adjust for spice tolerance)
    • 2 cloves garlic (or garlic powder to taste)
    • 1 1/2 tbsp honey
    • Salt and pepper to taste

    How to Make Chipotle Sauce

    1. Prep Your Ingredients:
      • If using fresh garlic, peel and finely mince it.
      • For a milder sauce, start with 4 chipotle peppers; for more heat, use up to 6.
    2. Blend Ingredients:
      • In a blender or food processor, combine sour cream, mayonnaise, chipotle peppers, garlic, honey, and a pinch of salt and pepper.
    3. Blend Until Smooth:
      • Process the mixture until fully smooth and creamy. Taste and adjust seasoning if needed.
    4. Chill (Optional):
      • For best flavor, chill the sauce in the refrigerator for 30 minutes before serving.

    Tips for the Perfect Chipotle Sauce

    • Adjust Spice Level: If you’re unsure about the heat, start with fewer peppers and add more gradually.
    • Flavor Variations: Add a squeeze of lime juice for tanginess or a handful of fresh cilantro for a herby twist.
    • Storage: Keep your chipotle sauce in an airtight container in the fridge for up to a week.
    • Serving Ideas: Use as a dip for fries or veggies, a spread for sandwiches, or a topping for tacos and grilled meats.

    This quick and easy chipotle sauce will become your go-to for adding smoky flavor to your favorite dishes!

  • Spicy Honey Beef Jerky

    A perfect blend of sweet and heat, this spicy honey beef jerky is a backcountry favorite. With tender strips of bottom-round beef marinated in a smoky, spicy-sweet glaze, it delivers a satisfying chew and a bold, memorable flavor.


    Ingredients

    • 2 lbs bottom round beef, thinly sliced
    • 1/3 cup honey
    • 1 tbsp ground cumin
    • 1 tsp crushed red pepper flakes (adjust for heat)
    • 1 tsp ground black pepper
    • 2 tsp kosher salt
    • 1/2 tsp liquid smoke
    • 1/4 cup water

    Instructions

    1. Prepare the Marinade:
      In a small saucepan over medium heat, combine honey, ground cumin, crushed red pepper flakes, black pepper, salt, liquid smoke, and water. Stir frequently until the mixture is well-blended and heated through (about 5 minutes). Let cool to room temperature.
    2. Marinate the Meat:
      Place thinly sliced beef strips into a large bowl or resealable bag. Pour the marinade over the meat, ensuring all pieces are evenly coated. Seal the bag or cover the bowl, then refrigerate for 24 hours, turning occasionally for even marination.
    3. Prepare the Beef for Dehydration:
      Remove the beef from the marinade and pat dry with paper towels to remove excess moisture. This helps the jerky dry evenly and prevents stickiness.
    4. Dehydrate:
      Lay the strips in a single layer on dehydrator trays, ensuring they do not overlap. Set the dehydrator to 165°F and dry for approximately 3 hours, or until the jerky reaches your preferred texture and chew.

    Tips for Perfect Jerky:

    • Cut Against the Grain: For a tender bite, slice the beef against the grain. For a chewier texture, cut with the grain.
    • Uniform Thickness: Keep slices about 1/8″ to 1/4″ thick for even drying.
    • Check for Doneness: Properly dried jerky should bend slightly before breaking, with no moisture in the center.
    • Storage: Store in an airtight container or vacuum-sealed bag for up to 2 weeks. For longer storage, freeze the jerky.
  • Flavor-Packed Chicken Pita with Homemade Chipotle Sauce 

    This Chicken Pita is a fresh, flavorful, and filling meal perfect for lunch or dinner. Tender seasoned chicken, sweet corn, savory Spanish rice, and juicy tomatoes are all tucked into a warm pita. Topped with our zesty homemade chipotle sauce, every bite is a burst of bold flavor. Quick to make and customizable to your taste, it’s a family favorite you’ll keep coming back to! 

    Ingredients: 

    • 2-3 pita bread rounds 
    • 1 lb chicken breast or thighs, cut into bite-sized pieces 
    • 1 cup cooked Spanish rice 
    • 1/2 cup corn (fresh, frozen, or canned) 
    • 1/2 cup chopped fresh tomatoes 
    • 1 tbsp olive oil (for cooking chicken) 
    • 1 tsp garlic powder 
    • 1 tsp onion powder 
    • 1/2 tsp smoked paprika 
    • Salt and pepper (to taste) 

    How-To: 

    1. Season and Cook the Chicken: 
    1. In a bowl, toss the chicken with garlic powder, onion powder, smoked paprika, salt, and pepper. 
    1. Heat olive oil in a skillet over medium heat. Add the seasoned chicken and cook for 6-8 minutes, or until fully cooked and golden brown. Remove from heat. 
    1. Prepare the Pita: 
    1. Warm the pita rounds in a dry pan or microwave for 20-30 seconds to make them pliable. 
    1. Assemble the Pita Pit: 
    1. Lay each pita flat. Add a layer of Spanish rice, a scoop of corn, and a portion of cooked chicken. 
    1. Top with chopped tomatoes. 
    1. Drizzle generously with our homemade chipotle sauce (link here). 
    1. Fold and Serve: 
    1. Fold the pita like a taco or roll it into a wrap. 
    1. Serve immediately and enjoy! 

    Tips for the Perfect Chicken Pita: 

    • Marinate for Extra Flavor: Marinate the chicken in your favorite spices and a splash of lime juice for 30 minutes before cooking. 
    • Mix and Match: Swap Spanish rice for brown rice, quinoa, or cauliflower rice for a low-carb option. 
    • Freshness Matters: Use fresh, ripe tomatoes for maximum flavor and texture. 
    • Chipotle Sauce: Our homemade chipotle sauce takes this pita to the next level—don’t skip it! 
    • Meal Prep: Cook extra chicken and rice to have ingredients ready for quick weekday meals. 

  • Traeger Smoked Salmon with Honey Mustard Glaze

    Enjoy a mouthwatering Traeger smoked salmon fillet with a sweet and tangy honey mustard glaze, seasoned simply with kosher salt and freshly cracked black pepper. This easy-to-follow recipe delivers perfectly tender, smoky salmon, ideal for family dinners or gatherings. 

    Ingredients: 

    • 1 large salmon fillet (2-3 lbs) 
    • 2 tbsp honey 
    • 2 tbsp Dijon mustard 
    • 1 tsp kosher salt 
    • 1/2 tsp freshly cracked black pepper 

    How-To: 

    1. Prepare the Salmon: Pat the salmon fillet dry and season evenly with kosher salt and pepper. 
    1. Make the Glaze: Mix honey and Dijon mustard in a small bowl. Brush a thin layer over the fillet, reserving some for later. 
    1. Preheat the Traeger: Set your Traeger grill to 225°F, using a mild wood pellet like alder or maple. 
    1. Smoke the Salmon: Place the salmon fillet skin-side down on the grill grates. Smoke for 1.5 to 2 hours or until the internal temperature reaches 145°F. 
    1. Glaze and Finish: Brush the reserved honey mustard glaze on the salmon during the last 20 minutes of smoking. 

    Tips: 

    • Salmon Quality: Use fresh, high-quality salmon for the best flavor. 
    • Wood Pairing: Alder or applewood enhances the natural sweetness of the fish. 
    • Serve with Style: Pair with roasted vegetables or a simple side salad for a complete meal. 
    • Storage: Refrigerate leftovers in an airtight container for up to 3 days. 

    This honey mustard Traeger smoked salmon is a showstopper, combining smoky richness with a perfect balance of sweet and savory flavors! 

  • White Rice and Garlic Shrimp Stir Fry 

    A quick, flavorful meal packed with juicy shrimp, fragrant garlic, and fluffy white rice. Perfect for busy weeknights, this one-pan dish is easy to make and bursting with savory goodness. 

    Ingredients 

    • 2 cups cooked white rice 
    • 1 lb shrimp (peeled and deveined) 
    • 4 cloves garlic, minced 
    • 2 tbsp soy sauce 
    • 1 tbsp sesame oil 
    • 1 tbsp olive oil 
    • 1/2 tsp red pepper flakes (optional) 
    • 1 cup mixed vegetables (e.g., bell peppers, carrots, peas) 
    • 2 green onions, sliced 
    • Salt and pepper to taste 

    How to Make It 

    1. Cook the Rice: Prepare white rice and set it aside. 
    1. Sauté Shrimp: Heat olive oil in a large skillet or wok over medium-high heat. Add shrimp, season with salt and pepper, and cook for 2-3 minutes until pink. Remove and set aside. 
    1. Cook Vegetables: In the same skillet, add sesame oil and sauté garlic for 30 seconds until fragrant. Toss in mixed vegetables and cook for 3-4 minutes. 
    1. Combine Ingredients: Add cooked rice, shrimp, soy sauce, and red pepper flakes. Stir-fry for 2 minutes until well combined. 
    1. Garnish and Serve: Sprinkle with green onions and serve hot. 

    Tips 

    • Use day-old rice for the best texture. 
    • Substitute tamari for soy sauce to make it gluten-free. 
    • Add a splash of lime juice for extra zing. 
    • Double the veggies for a healthier twist! 

    Enjoy this easy stir fry, a perfect blend of simplicity and flavor! 

  • Biscuits for Dummies

    Description: 

    These fluffy, golden biscuits are foolproof and delicious, with a subtle sweetness from honey that makes them truly irresistible. Perfect for breakfast, brunch, or dinner, this recipe is easy to follow and delivers buttery biscuits with a soft, tender crumb every time. Don’t skip the honey—it’s the secret to their magic! 

    Ingredients: 

    • 2 ½ cups all-purpose flour 
    • 2 tbsp baking powder 
    • 1 tsp salt 
    • 3 tbsp honey, divided 
    • ½ cup very cold or frozen butter 
    • 1 cup + 2 tbsp buttermilk 
    • 3 tbsp butter, melted 
    • Fresh cracked black pepper for topping 

    Instructions: 

    1. Preheat your oven to 425°F (220°C) and grease a baking sheet. 
    1. In a large mixing bowl, whisk together the flour, baking powder, and salt. 
    1. Cut the cold butter into the flour mixture using a biscuit cutter or your fingers until the butter pieces are the size of peas. 
    1. In a small bowl, mix 2 tbsp of honey into the buttermilk. Pour this mixture into the dry ingredients and gently stir just until combined. Be careful not to overmix. 
    1. Turn the dough onto a floured surface. Fold it over itself several times and gently pat it down to about 1 ½ inches thick. Avoid overhandling the dough. 
    1. Use a biscuit cutter, glass, or mug to cut out biscuits. Arrange them on the prepared baking sheet. 
    1. Bake for 14-15 minutes, until the tops begin to turn golden. 
    1. While the biscuits bake, mix the melted butter with the remaining 1 tbsp of honey. 
    1. Remove the biscuits from the oven, brush generously with the honey butter, and top with a crack of black pepper. Return them to the oven for another 4 minutes. 
    1. Serve warm and enjoy! 

    Tips for Perfect Biscuits: 

    • Keep the butter as cold as possible for flaky layers; freeze it if needed. 
    • Use a light hand when mixing and folding to maintain a tender texture. 
    • For extra rise, ensure the biscuit cutter is sharp and press straight down without twisting. 
    • These biscuits are delicious on their own or served with gravy, butter, or jam. 

    You’ll love how simple and delicious these biscuits are—great for beginners and seasoned bakers alike! 

  • Chocolate Chip Shortbread Cookies Recipe 

    Description: 

    These buttery Chocolate Chip Shortbread Cookies are the perfect balance of crisp and crumbly, studded with melty chocolate chips. Ideal for holiday celebrations, elegant tea parties, or a simple everyday treat, these cookies are easy to make and absolutely irresistible. 

    Ingredients: 

    • 1 ¾ cups all-purpose flour 
    • ½ tsp baking powder 
    • 1 cup salted butter, softened 
    • ½ cup white sugar 
    • 1 cup chocolate chips 

    Instructions: 

    1. Preheat your oven to 300°F (150°C) and lightly grease a baking sheet or line it with parchment paper. 
    1. In a small bowl, whisk together the flour and baking powder. Set aside. 
    1. In a large mixing bowl, beat the softened butter and sugar together until creamy and smooth. 
    1. Gradually mix the flour mixture into the butter mixture until a soft dough forms. Fold in the chocolate chips. 
    1. Scoop out small portions of dough and roll them into 1-inch balls. Arrange the balls on the prepared baking sheet, leaving some space between each cookie. 
    1. Bake for 20 minutes or until the bottoms of the cookies are just lightly golden. 
    1. Let the cookies cool on the baking sheet for 5 minutes, then transfer them to a wire rack to cool completely. 

    Tips for Perfect Cookies: 

    • Use high-quality butter for the best flavor and texture. 
    • Chill the dough for 15-20 minutes if it’s too soft to handle. 
    • For a decorative twist, drizzle melted chocolate over the cooled cookies. 
    • Store in an airtight container at room temperature for up to a week. 

    These simple, delicious cookies pair wonderfully with tea, coffee, or hot cocoa, making them a timeless treat for any occasion.